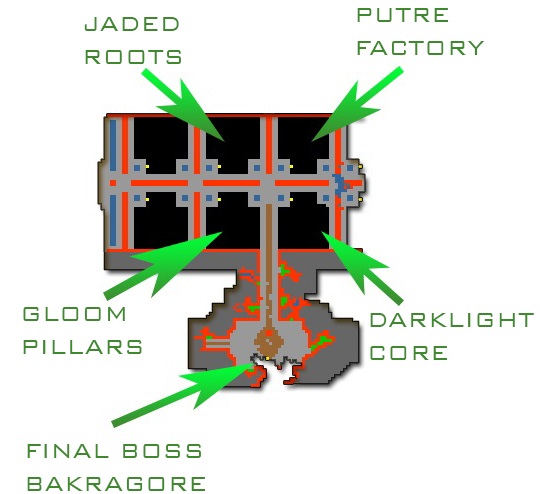
The area of Rotten Blood Quest is called “Blood Vestibule” and it consists of 4 sub-areas:
- Jared Roots (mini boss – Murcion)
- Putre Factory (mini boss – Ichgahal)
- Gloom Pillars (mini boss – Chagorz)
- Darklight Core (mini boss – Vemiath)
In order to fight with final boss Bakragore (yep, that’s the badass which drops new Sanguine set) you will have to successfully fight will all of 4 above mini bosses.

To be able to enter mini bosses rooms, each player needs to charge 100 “The Rotten Charges” earlier (NOTE: counter is visible near player's nick). You will gain 1 charge per every 20 seconds you stay in specific sub-area. It means that in worst case you will have to spend 33 minutes and 33 seconds in each area before fighting each boss.
The good news is that you can speed it up by using specific mechanics for each sub-area. There is one common mechanic for all sub-areas which are Large Spore Reservoir  (for Jared Roots & Putre Factory) and Darklight Obelisk
  (for Gloom Pillars & Darklight Core). They appear in each are in numbers between 3 and 6. By simply using them you will shorten the charging time by 5 minutes (15 Rotten Charges per usage).
Each sub-area has additional mechanics reserved for itself which can shorten the time of Rotten Charging and which can also bring you death.

To speed up charging your Rotten Charges you will need to loot Organic Acid  from monster Oozing Corpus which occurs in Jared Roots. Once you got that thing in your backpack you can use it on
  . By using Organic Acid on it, you will receive 1 Rotten Charge (+20 seconds)
WARNING: After killing any monster in Jared Roots there is a chance to spawn Decaying Totem  . It cannot be killed but it can easily kill you. It throws 4 spells, which are circle-shaped. First circle is small, but with every next spell it’s getting bigger and has bigger range. After the 4th spell is thrown, Decaying Totem simply disappears.

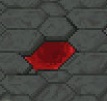
To speed up that sub-area you will need to loot Lichen Gobbler  from monster Meandering Mushroom which occurs in Putre Factory. Once you got that thing in your backpack you can use it on Rotten Floor which looks
 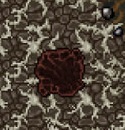 . By using Lichen Gobbler on it, you will receive 1 Rotten Charge (+20 seconds).
WARNING: In bigger spaces of Putre Factory you will meet Radicular Totem  They might be very deadly for players because their wave spells will hit up to 6k Earth DMG!!! The good thing is that you are able to predict its hits. First Radicular Totem will hit a short wave, then the long wave in the same direction. Afterwards it will do the same, but rotated by 90 degress clock-wise. It means that full rotation (360 degrees) of it waves will take 8 rounds. PRO TIP: The waves thrown by Radicular Totem can be blocked by Magic Wall Runes!

To speed up that sub-area you will need to loot Darklight Obsidian Axe  from monster Darklight Construct which occurs in Gloom Pillars. Once you got that thing in your backpack you can use it on Basalt Pillar which looks like on a screen attached below.
 After doing it, you will receive 3 Rotten Charge (+1 minute).
WARNING: You really need to be carefull and watch your Rotten Charge Count in this sub-area. After receiving 100 Rotten Charges, you will receive a strong energy attack (approx. 3k DMG). If players stay close to each other this spell can turn into a chain-spell, which means that it can jump from one to another 4 players. Every next chain-spell is stronger than previous one so you can easily imagine how deadly it can be.

To speed up that sub-area you will need to loot either Yellow Darklight Matter  from monster Darklight Source or Unstable Darklight Matter
  from Darklight Matter & Darklight Striker which all occure in Darklight Core. Once you got that in your backpack you can use it on Darklight Pore which looks like on a screen attached below.
Note that if you use Unstable Darklight Matter you will receive 1 Rotten Charge (+20 seconds) but if you use Yellow Darklight Matter you will receive 3 Rotten Charges (+1 minute).
WARNING: This sub-area is most difficult of all 4. As a proof I can mention many deaths of high-level players. But to the point. All of monster which appear in Darklight Core can throw Dark Energy Bombs under players feet as single sqm or in shape of cross (3x3 sqm). These Dark Energy Fields inflict damage from Agony. This damage is some % of your current HP. Unfortunately I can’t clearly say how many % is that. This Agony curse will last 12 seconds. With every second of its duration you will receive damages of Agony which will be in amount half of previous. It means if you receive 2000 DMG in first hit, second hit will be 1000 DMG, third will go for 500 DMG as so on. The good news is that you can destroy Dark Energy Fields with a Destroy Field Rune.

All of Mini-Bosses do have something in common. And these things are their AoE spells. As you can guess, their DMG is massive. All of below described bosses have the same AoE Death Spell and one special Aoe Spell with different type of DMG.
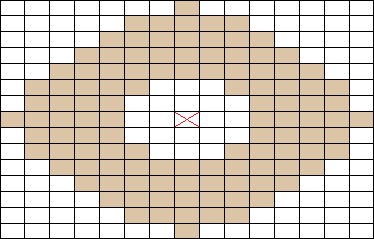
On this screenshot you can see range of Death Spell, which bosses throw at players (X is player). DMG is around ~3k.
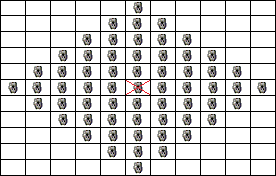
Also on this screenshot you can see range of personalised spells, but range is the same. Hits are for around ~2k DMG. These spells are thrown under bosses' paws. (X is boss)
Type of DMG from bosses:
- Murcion - Death
- Ichgahal - Earth
- Chagorz - Energy
- Vermiath - Energy


Murcion will appear in chamber with 2 Elder Bloodjaws  . They are really horrible mana leechers! Also their hits are around ~1k DMG per round to blocking EK who is skilled and equiped. Don't want to know how HP would take ED or MS. When moving or standing Murcion leaves white marks on floor (which look like a flour). If boss steps on these marks, it will heal for 13 500 HP. If a player steps on marks, he will lose around 10-15% of his HP due to Agony hit. From time to time Murcion will spawn Mushrooms 3-4
  near him. They don't move and can't be killed. After players stand to close to them, they will explode dealing 2,5k DMG (type Life Leech). Mushrooms disappear after about 5-7 seconds anyway.
The tactic you can use is separating Murcion from the Bloodjaws and running big circles with him so he doesn’t stand on his marks. Shooters stand in the middle and only receive AoE spell with Death DMG.


Also Ichgahal will spawn some Mushrooms . Mechanics of Mushrooms are the same as with Murcion.
Ichgahal leaves behind him dark marks, which after few seconds become brigther and they eventually disappear after another few seconds (but if you stand on them, they turn into Poison Field). Just like with previous mini boss, Ichgahal will heal himself for 13 500 HP after stepping on any of these two marks. When player stands on them, following things will happen:

- when stepping on dark mark – you will receive ~5% Agony DMG and also LESSER HEX
- when stepping on bright mark this mark will turn into poison field – you will receive ~7% Agony DMG and also INTENSE HEX
- when stepping on poison field – you will receive ~10% Agony DMG AND also GREATER HEX
You might ask what are these mentioned HEXes? You probably have seen this mechanic on other bosses like Sir Baeloc, Sir Nictros, King Zelos, The Monster, The Pale Worm.
You can see how HEXes affect you in below table. As you probably quickly realised – YOU DON’T WANT TO BE HEXED IN MINI BOSS ROOM!

Ichgahal is a twin of Murcion and because of that there are familiarities with tactics – run big circles with boss, avoid touching exploding Mushrooms and you should be fine!


In this room, every player is supposed to be in constant move. It’s because every player has a counter near his nick, if the counter hits 20, player will receive up to ~20% HP as Agony DMG. By moving, the counter drops its number but leaves behind player marks (opposite in Murcion and Ichgahal where boss leaves marks). Player while stepping on his marks will lose ~3% HP as Agony DMG. Chagorz while stepping on marks will heal for ~400 HP (thanks God only 400 not 13500 like in Murcion and Ichgahal because now 5 players leave marks on floor and it’s very messy inside). Inside Chagorz’s chamber you will find Pillars of Dark Energy  . They work exactly as Mushrooms – can’t be killed, but also players after getting to close will receive 1000 Fire DMG per round for 10 seconds. After some time Pillars will explode dealing AoE damage around it.
Also every 90 seconds in the middle of the room there will appear Rotten Charge (looks like orange teleport). You will have 15 seconds to lure 1 of 2 Elder Bloodjaws present in the room.
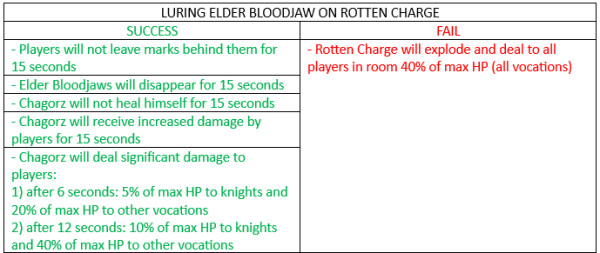
The best tactic for Chagorz is to split Mini Boss and Bloodjaws. Main blocker (now meta is for RP) should take care of Boss and run big circles with him, the second blocker (Knight) should focus on Bloodjaws and lure them to Rotten Charge. Also when after luring Bloodjaws to TP, Knight takes over blocking boss until all players receive massive hits 12 seconds after luring Bloodjaws. When Bloodjaws appear again, RP again blocks boss and EL blocks Bloodjaws.


He is twin of Chagorz and the mechanics in both chambers will be familiar. In room of Vemiath you will also find 2 Bloodjaws. Players also need to be still in move, because like with Chagorz they will receive huge DMG up to ~30% of HP as Agony when their rotten counter will show 20 charges. You will also leave black marks behind you, but before they disappear, they will turn blue for few seconds. If Vemiath steps on black mark he will heal miself for 200 HP, if steps on blue mark he will heal himself for 400 HP. Also players will receive ~15% of HP as Agony DMG when stepping on black mark and ~5% of HP as Agony DMG when stepping on blue mark. Also once in 90 seconds will appear Rotten Charge (orange teleport) in the middle of the chamber. Mechanics after succeeding/failing will also be the same as with Chagorz.
And also the best tactic for Vemiath z is to split Mini Boss and Bloodjaws. RP should take care of Boss and run big circles with him, the EK should focus on Bloodjaws and lure them to Rotten Charge. EK and RP will change roles for 15 seconds after luring Bloodjaws to TP.

To proceed to fight with Main Boss Bakragore you need 4 Taints. Killing each mini Boss will give you 1 Taint (NOTE: killing for example 2 Murcions will not give you 2 taints). Every taint makes it more difficult to survive in Blood Vestibule (in all sub-areas and chambers of mini-bosses).
Penalties due to gaining further taints:
1 Taint – there will be a chance to swap spots between player and a random melee monster
2 Taints – there will be a chance to spawn a Bloodjaw in spot that just died another monster in every sub-area, also in every further mini-boss chamber will spawn additional 1 Elder Bloodjaw
3 Taints – there will be a chance to be rooted by monsters
4 Taints – players will receive 14% more damage in all areas of Blood Vestibule
The most optimum way to kill mini-bosses is to start from the hardest and proceed to the easiest one. From what I have heard the best rotation is:
Murcion ->Vemiath -> Chagorz -> Ichgahal


After dealing with all of 4 Mini Bosses you will finally gain access to Bakragore. To fight with him you don’t need to collect Rotten Charges like in 4 sub-areas. I would compare this part to „Gold Bosses” because the final room is a mix of mechanics from all Mini Bosses. The situation in here looks exactly the same.
In Bakraore’s chamber you will meet 4 Elder Bloodjaws, Mushrooms and Pillars of Dark Energy. Bakragore will leave behind him white marks (that ones which look like flour). Players need to be still in move or they will receive 20% of HP as Agony DMG. Also players will leave marks behind them which heal Bakragore and deal DMG to other players. Every 90 seconds will appear Rotten Charge (orange teleport) where you need to lure the Elder Bloodjaws. The biggest change in this final room is the damage you receive after succeed/fail with luring.
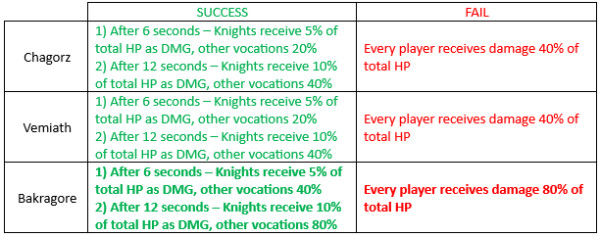
As you can see, if you fail to lure Bloodjaw on Rotten Charge, you are most likely to be dead.
Just like before the best way to fight Bakragore is to separate him from Bloodjaws. Main knight should take care of Boss and run big circles with him, other blocker should focus on Bloodjaws and lure them to Rotten Charge.
Congratulations! I hope you found a Bag You Convet (bag containing Sanguine Items)
If not, don't worry. There is also one more mechanic which will increase your % chance to drop such bag. With every time you don't manage to loot bag, your chances significantly rise up to moment that you will achieve your goal!